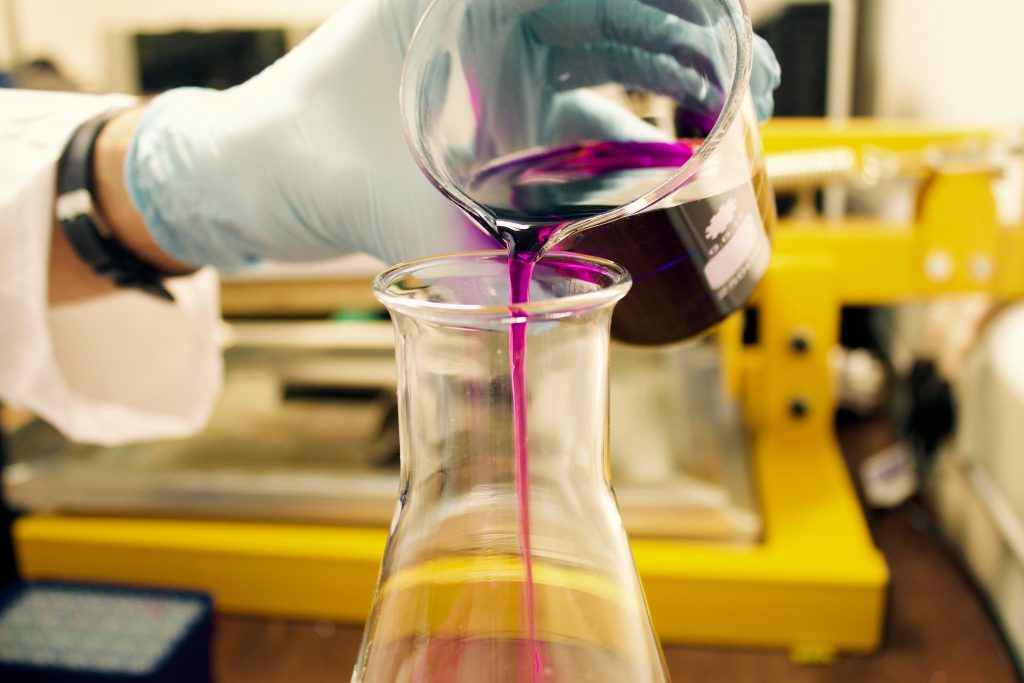
If you’re looking for an idea for an upcoming science project, or just looking for something fun to do one afternoon… you’ve come to the right place because we listed some science experiments in this blog!
Here at Student-Tutor, we love science!
From Thomas Edison, Albert Einstein, and Nikola Tesla, to today’s modern renegades like Steven Hawkings, Carl Sagan, and Elon Musk; we see the way science has transformed and revolutionized our world and the way we think about things.
It is without a doubt that these influential leaders once found themselves tinkering, learning, and experimenting as kids and teenagers. Here are some fun science experiments these great scientists may have once enjoyed!
Here Are 10 of the Best Kid’s Science Experiments to Try Today!
These classic science experiments are perfect for learning in the classroom whether you are enrolled in a private or public school. You can also do this at home! Make sure you get your parent or teacher’s permission before jumping in… some of these can be messy! Also, there are some school clubs that will teach you more of these so find one and join.
1. Rubber Egg Science – Via: Little Bins for Little Hands

Source: Little Bins for Little Hands
The first experiment on this list is one you may already have all of the supplies for!
If you weren’t already aware, there are many different fun egg science experiments! In this example, we’ll be looking at the timeless “Rubber Egg” experiment; where we’ll be using acetic acid (vinegar) to cause a chemical reaction with calcium carbonate (the eggshell).
The reaction looks like this:

To get started, all you will need is:
- 1 Egg… or a Dozen!
- 1 Mason Jar or Glass Vase.
- 1 Bottle of White Vinegar.
- 1 Week’s Time.
Steps to create this experiment:
- Place your egg inside the jar or vase.
- Cover the egg with vinegar.
- Wait 24 hours, then drain the jar and fill with fresh vinegar.
- Leave the egg in the vinegar for 7 full days, record any changes you observe.
- Drain vinegar, rinse, and report any observed changes to the egg.
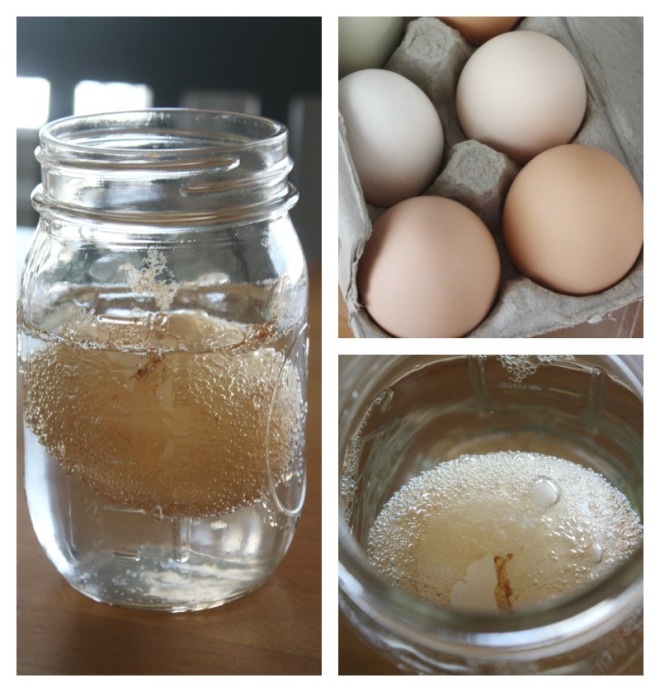
Source: Little Bins for Little Hands
Observations and results:
Over the course of this experiment, the egg will undergo a significant change to its physical properties…
Did you notice anything strange or unusual?
- Did you notice any bubbles along the sides of the egg?
- Was the egg soft after the week had passed?
- Can you see through it with a flash light?
- Does the egg bounce?
- Will it pop if you squeeze it?
- What caused this transformation to the shell?
- Why do you think this happened?
The egg looks translucent when you shine a flashlight through it because the hard outside shell is gone. The only part that remains is the thin membrane called a semipermeable membrane. You might have noticed that the egg got a little bigger after soaking in the vinegar. Here’s what happened…Some of the water in the vinegar solution (remember that household vinegar is 96% water) traveled through the egg’s membrane in an effort to equalize the concentration of water on both sides of the membrane. This flow of water through a semipermeable membrane is called osmosis. Via: Steve Spangler Science
See this experiment in action, courtesy of Sick Science!
2. Potato Powered Alarm Clock – Via: PBS Kids

Source: Robert Lee Fulghum
Renewable energy is the future!
With populations all across the world seeking out new ways to power devices, stay cool in the summer, and access all the other many benefits of modern electrical power; maybe it’s time we learn how we can start making our own totally FREE electricity… from potatoes! This is one of the many science experiments that promote sustainable living!
Here’s what you’ll need to start your own tiny power plant:
- Two Potatoes and One Kitchen Plate.
- Three 8″ Pieces of Insulated Copper Wire (each with 2″ of insulation removed).
- Two Pennies.
- Two Common Galvanized Nails.
- One Digital Alarm Clock.
- Advanced: Digital Multimeter.
Steps to create this experiment:
- Cut a potato in half and put the two halves on a plate so they stand on their flat ends.
- Wrap the end of one piece of wire around a galvanized nail and wrap the end of a second piece of wire around a penny.
- Stick the nail and penny into one half of the potato so that they’re not touching each other.
- Wrap the third piece of wire around the other penny and put it into the other half of the potato.
- Put the other nail into the second half of the potato, but this nail should not have wire wrapped around it.
- Connect the wire from the penny on the first half of the potato to the nail that has no wire on it in the second half of the potato.
- Touch the free ends of the wires to the wires coming out of the digital clock, get power through the clock.
- Advanced: Use your digital multi-meter to see how much power you can generate through the potatoes.
Observations and results:
Did your clock turn on? No? Try connecting the wires in different ways… did anything change?
A potato battery is an electrochemical battery, otherwise known as an electrochemical cell. An electrochemical cell is a cell in which chemical energy is converted to electric energy by a spontaneous electron transfer. In the case of the potato, the zinc in the nail reacts with the copper wire. The potato acts as a sort of buffer between the zinc ions and the copper ions. The zinc and copper ions would still react if they touched within the potato but they would only generate heat. Since the potato keeps them apart, the electron transfer has to take place over the copper wires of the circuit, which channels the energy into the clock. Presto! You have potato power. Via: Kidzworld
See this experiment in action, courtesy of Taras Kul
3. Alka-Seltzer Powered Film Canister Rocket – Via: The Science Kiddo
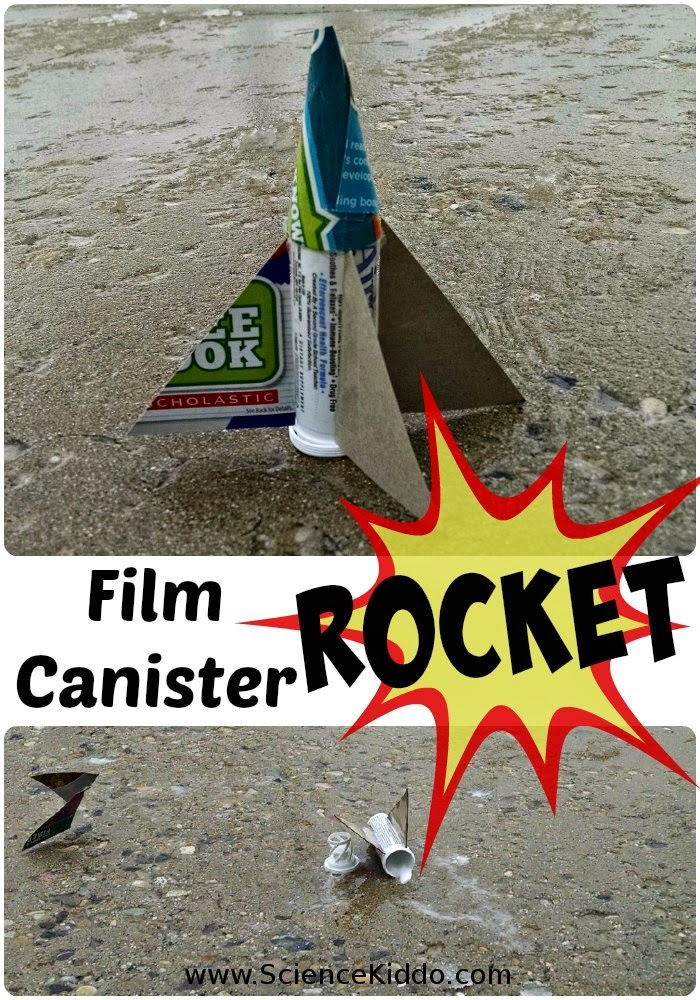
Source: The Science Kiddo
We think most young scientists would agree… there’s almost nothing more fun than sending a rocket soaring into the air! In fact, there are many science experiments that aim to imitate the same concept.
Though you may not be sending a Tesla Roadster from Earth to Mars, you can certainly get some incredible results from launching this Alka-Seltzer powered rocket from an open parking lot! This is another one the science experiments which is perfect for understanding how even the smallest of rockets create enormous amounts of thrust using high-pressure gas. For a detailed overview of basic rocket science, check out “How Rocket Engines Work” by How Stuff Works.
No fuel rods necessary… just grab:
- One or more snap-top plastic bottles – Ex: 35mm film canisters (vintage, right?), Airborne tablet tubes, M&M Minis tubes, etc… get creative!
- A bottle of water.
- Alka-Seltzer tablets.
- Cardboard & hot glue to construct a proper rocket frame (optional).
- Protective goggles – Safety first!
Steps to create this experiment:
- Construct your rocket.
- Add water (fuel) to your canister.
- Drop one Alka-Seltzer tablet (oxidizer) into canister.
- Quickly close the canister, set rocket upright, and take cover!
- Blast Off!!

Source: NASA
Observations and results:
Did your rocket take flight as expected!?
- How high did your rocket fly? Advanced: Rocket Equations
- What happens if you use more/less fuel?
- What happens if you use more/less oxidizer?
- What fuel/oxidizer ratio worked the best for your specific canister?
- How did the cardboard body design affect your rocket’s flight path?
So what makes the explosion happen? It is actually the same chemistry that happens when you mix baking soda and vinegar together. An acid plus a base mix to form carbon dioxide gas, which are the bubbles you see. When enough carbon dioxide has been produced the pressure builds until the container can no longer contain it, at which point the top pops off and the gas and liquid explode out. Alka-Seltzer is made of citric acid and sodium bicarbonate (baking soda), which acts as a base. When the tablets are solid and dry the acid and base don’t react, but as soon as they are immersed in water they react to form carbon dioxide. This is what causes the explosion. Via: The Science Kiddo
See this experiment in action, courtesy of GrandadIsAnOldMan.
4. Rain Cloud in a Jar – Via: Fun Learning for Kids
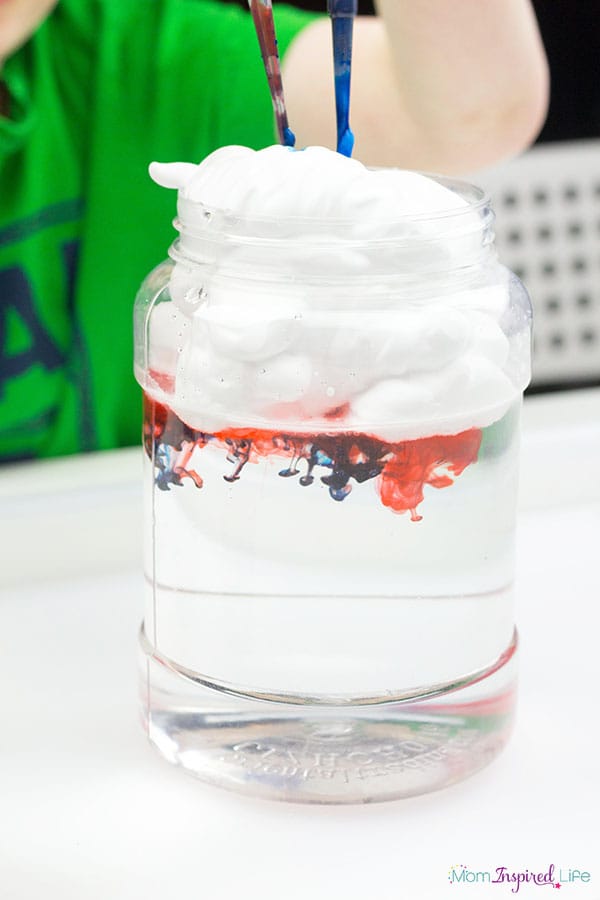
Source: Fun Learning for Kids
Here’s one of the most interesting science experiments for the next generation of meteorologists!
This is one of the easiest Earth science experiments for kids which will help them visualize how clouds are formed, and how Earth’s water cycle creates rain! Making clouds in a jar is easier than you might think! This experiment is perfect for the classroom, or for learning at home!
We’ll only need a few ingredients to make awesome jar clouds:
- One large glass mason jar or plastic cup.
- Shaving cream – Foam, not gel.
- Food coloring or washable watercolors.
- Pipettes or eye droppers.
- Water.
Steps to create this experiment:
- Fill the large jar with water until it is about 3/4 full.
- Use your shaving cream to create a thick cloud layer on top of the water.
- Wait 1-3 minutes for the foam to settle.
- Drop food coloring or watercolor on top of foam.
- Observe what happens within and below your cloud!

Source: Google Galaxy Science
Observations and results:
What did you notice after you dropped the coloring into the cloud?
- Did the cloud change colors?
- Did the colors stay suspended for a moment before dropping?
- What caused the colors to make it through the cloud?
- Did different colors have a different effect?
- What happens if you use warm vs cold water?
Clouds are formed when water vapor rises into the air. When the vapor hits cold air, it turns back into droplets of water. Those tiny drops of water floating in the air collect and “stick” together to form clouds. When clouds get so full of water that they can’t hold any more, the water falls back to the ground as rain. Via: Kidspot
See this experiment in action, courtesy of HooplaKidzLab.
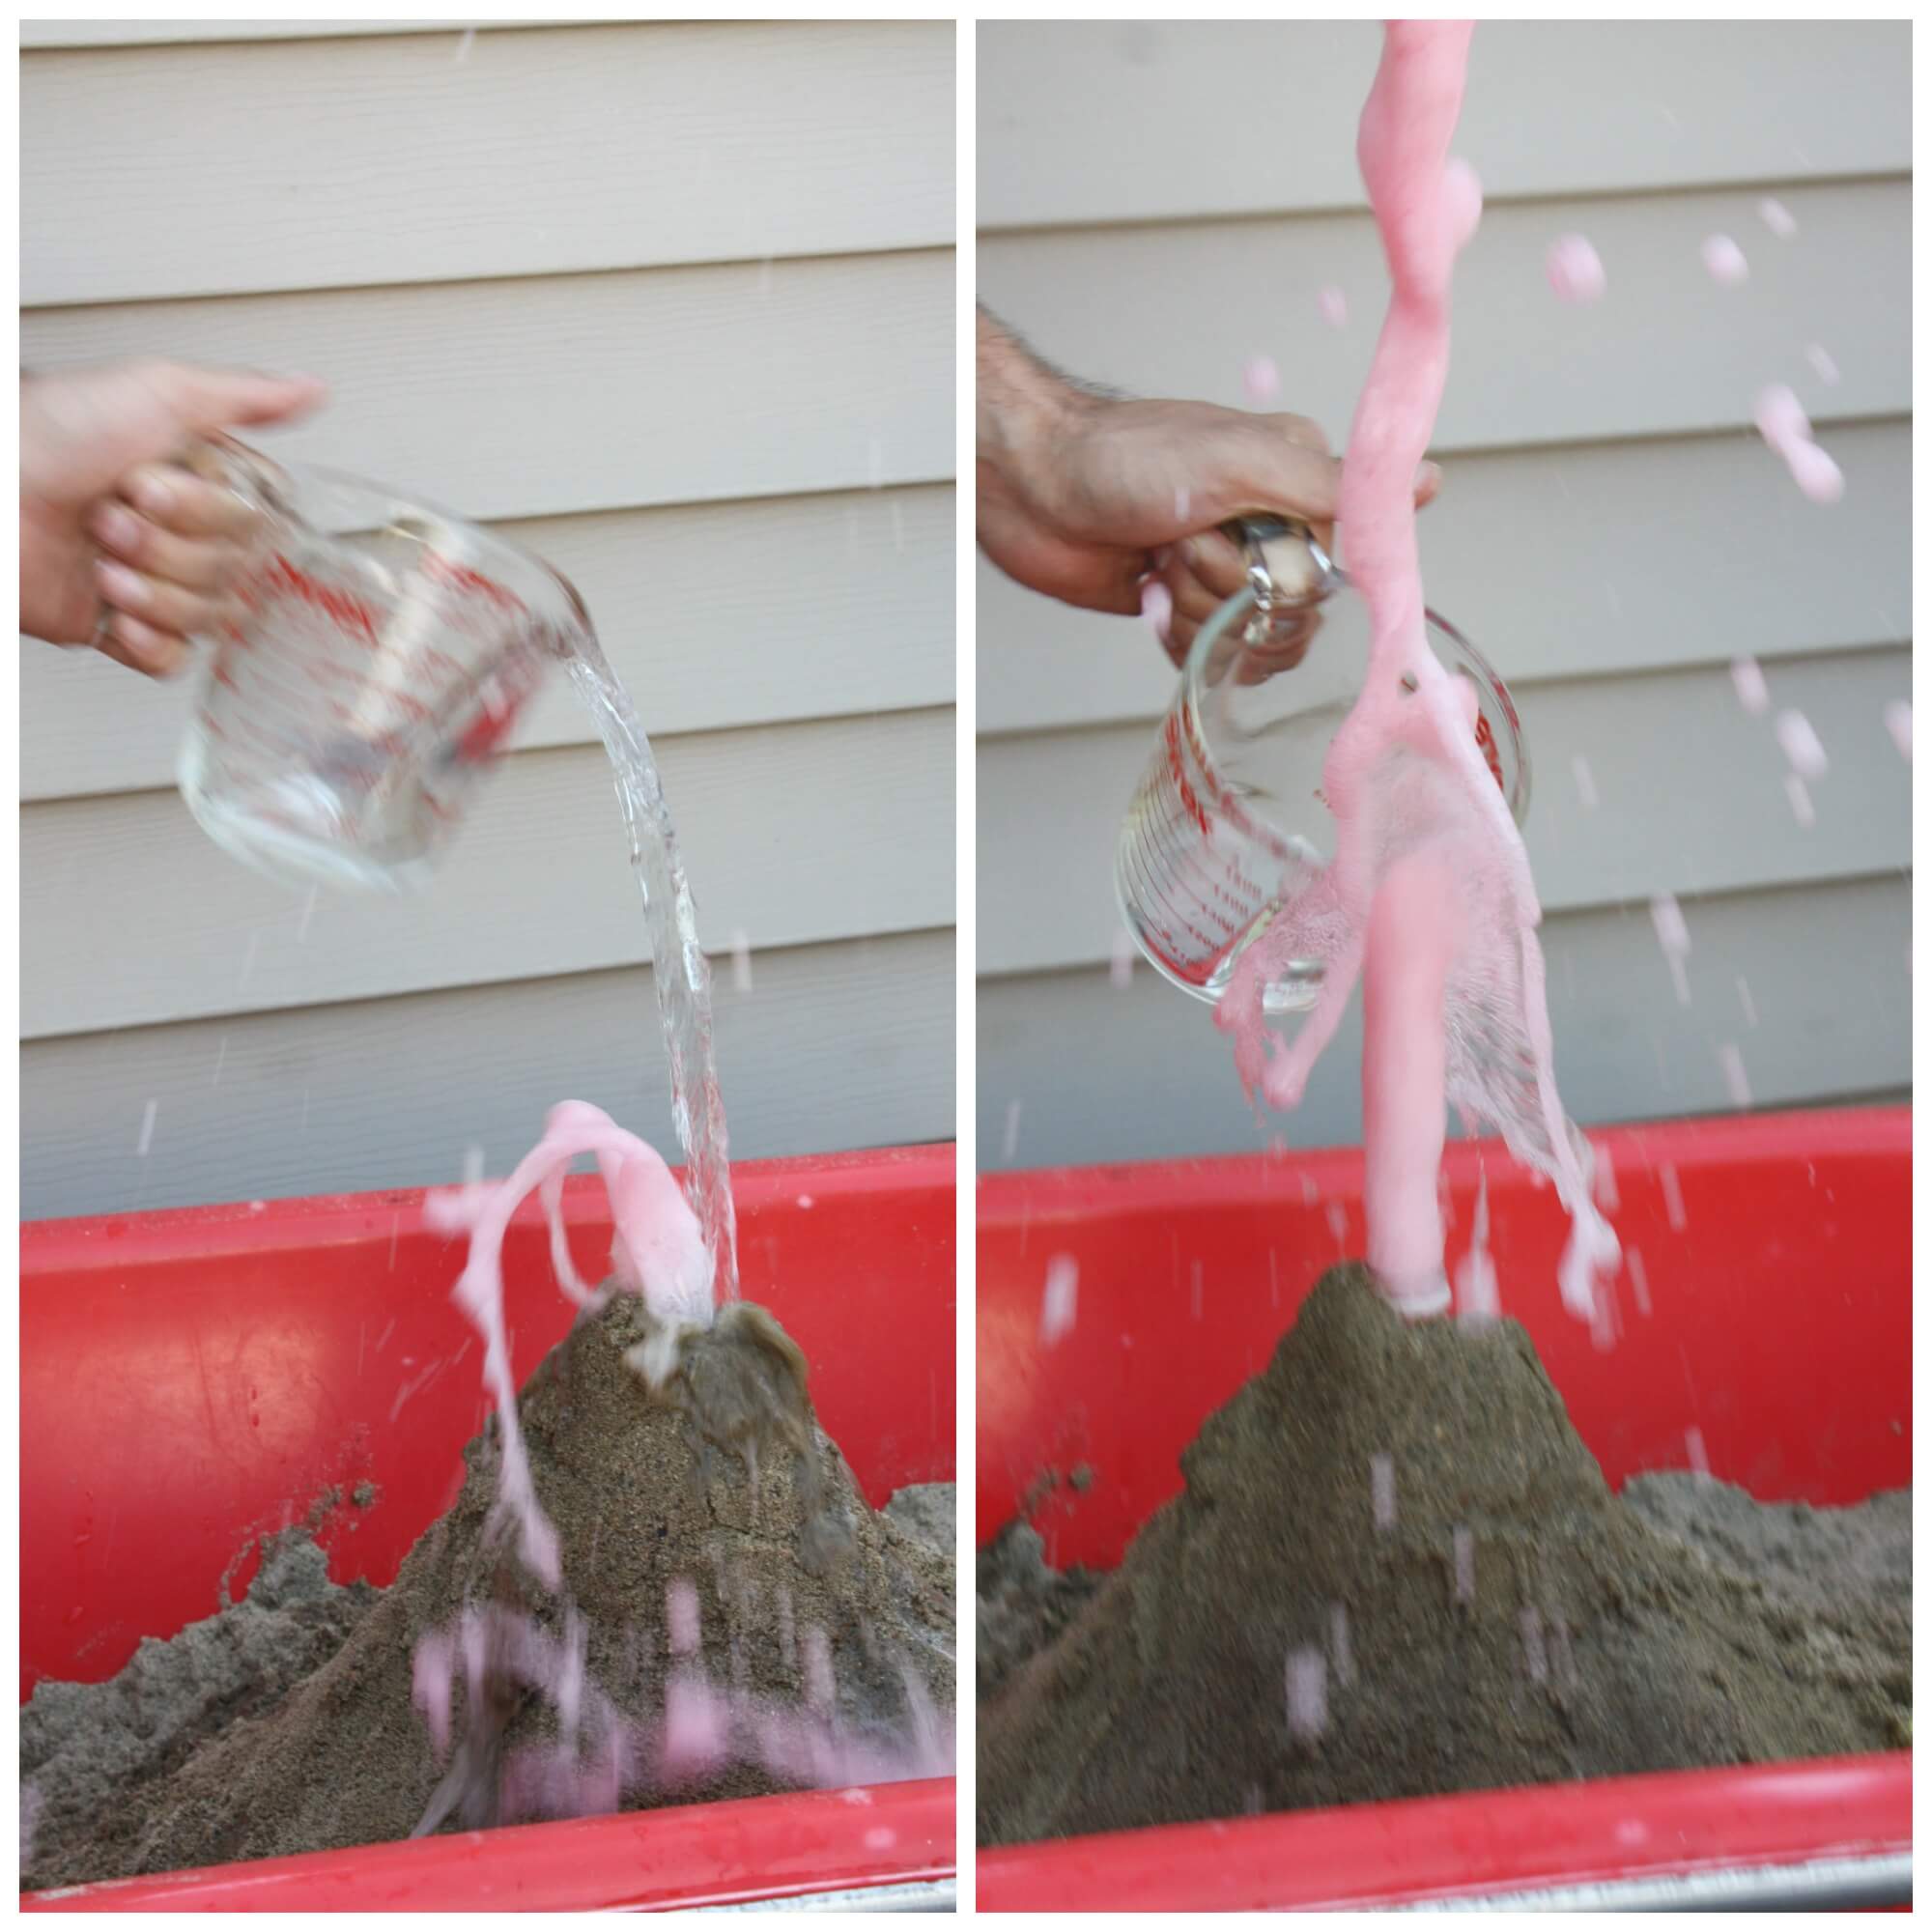
5. Classic Erupting Volcano Science Project – Via: ThoughtCo.
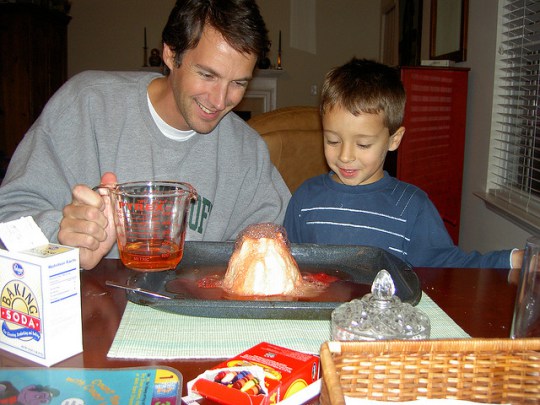
Source: Red Tricycle
Here we have probably one of the most popular, yet controversial science experiments of the last decade!
Almost all students, at some point, have heard of science experiments involving DIY erupting volcanoes.
Given its incredible simplicity, overwhelming popularity at science fairs, and the endless potential for customization, the erupting volcano has sometimes been deemed “lazy” or “uninspired” by some teachers, as it relates to fair and/or class project submissions. However… we’re not here for a grade… we’re here to have some fun! So without further ado, we present the world-famous erupting volcano experiment!
This project has two main parts, the volcano itself and the chemicals that cause the eruption.
You will need the following:
- 6 cups flour.
- 2 cups salt.
- 4 tablespoons cooking oil.
- Warm water.
- Plastic soda bottle.
- Dish washing detergent.
- Food coloring.
- Vinegar.
- Baking dish or another pan.
- 2 tablespoons of baking soda.
Steps to create this experiment:
- Mix 6 cups flour, 2 cups salt, 4 tablespoons cooking oil, and 2 cups of water. The resulting mixture should be smooth and firm (more water may be added if needed).
- Stand the soda bottle in the baking pan and mold your fresh dough around it, creating a volcano shape. Make sure you don’t cover the bottle’s hole or drop dough into it!
- Allow your volcano to dry and harden, then paint it as desired (optional).
- Fill the bottle most of the way with warm water and a bit of red food color.
- Add 6 drops of detergent to the bottle. (Detergent helps trap the bubbles produced by the reaction so you get better lava!)
- Add 2 tablespoons of baking soda to the liquid.
- Slowly pour vinegar into the bottle… then step back!
- Observe the eruption and record your thoughts!
Source: Little Bins for Little Hands
Observations and results:
What happened after you added the vinegar to the bottle?
- Was the eruption as mellow or violent as you expected?
- What happens if you use more baking soda?
- What happens if you use less warm water?
- Can you think of any way to make the eruption bigger?
- How can you make the eruption last longer?
The red lava is the result of a chemical reaction between the baking soda and vinegar. In this reaction, the carbon dioxide gas is produced, pressure builds up inside the plastic bottle until the gas bubbles out of the volcano. This is a good representation of what happens in real volcanoes. Via: Weather Wiz Kids.
See this experiment in action, courtesy of Kids Go Smart
6. Making a Sundial – Via: LASP Colorado.
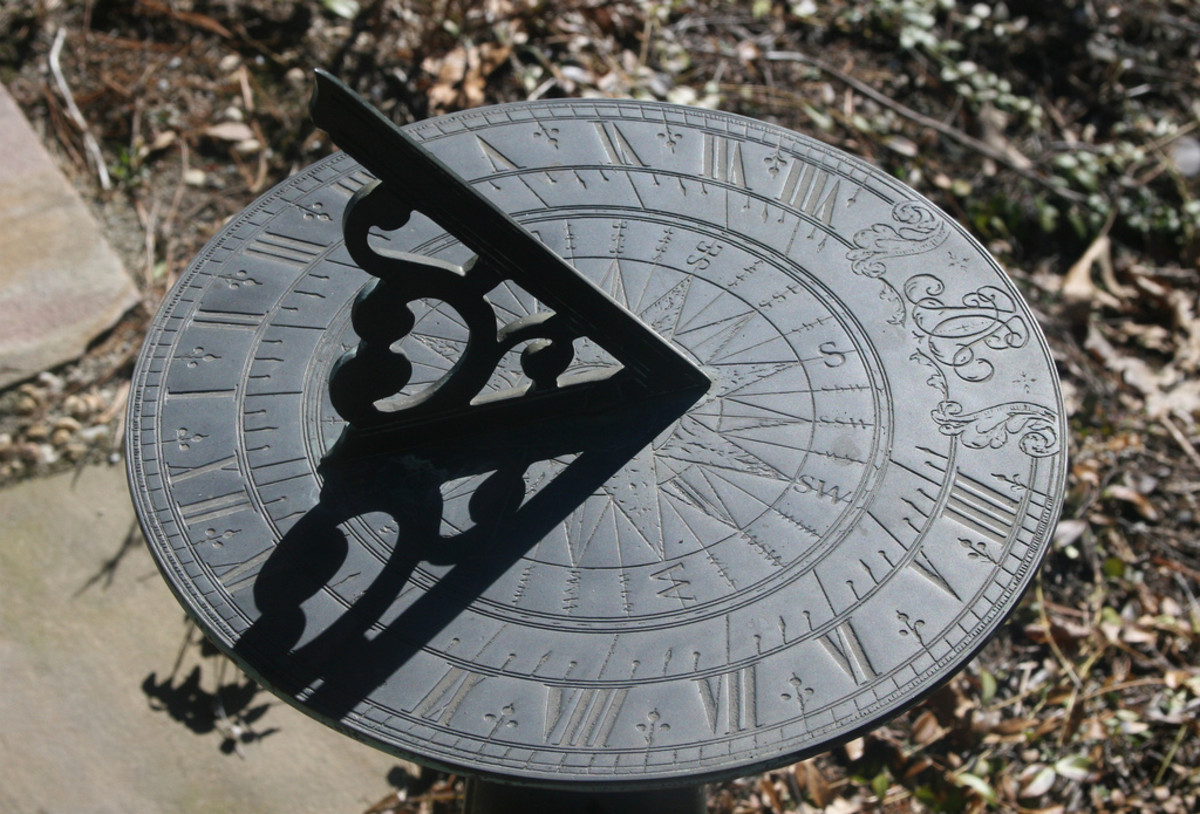
Source: We Have Kids
Though we don’t see sundials used as much as other time tracking devices, understanding how they work can open a student’s perspective to a broader sense of how the Earth’s position in space, relative to the sun, creates our daily and annual cycles!
Students who follow the detailed guide provided by LASP will find themselves with a home made sundial and the opportunity to track the movement of the sun, and determine the time of local solar noon.
To get started, all you will need is:
- 1 Wooden dowel or similar pole at least 50cm long.
- 12-24 Shadow markers (flags, rocks, sticks, nails, etc.)
- 1 Meter stick.
Steps to create this experiment:
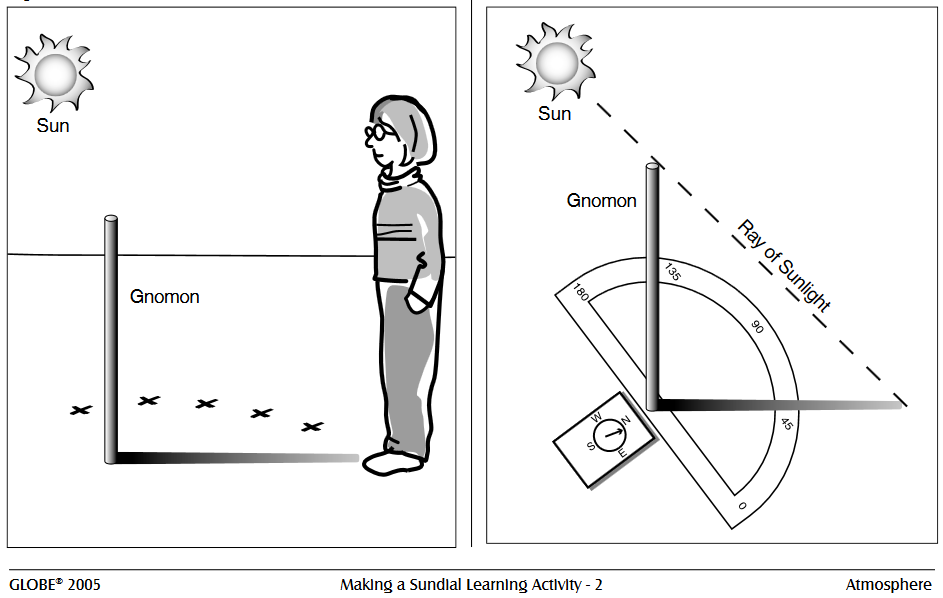
- Select a day that will be sunny for at least seven hours.
- Head outside to a relatively flat spot that will be out of the shadow of buildings and trees. Place the pole in the ground making certain that it is perpendicular to the ground using a plumb bob (a piece of string with a weight on it) or a level. Measure and record the height from the ground to the top of the pole.
- Put a #1 on the first object (rock, flag, etc.) you will use to mark the position of the shadows. Place the marker on the ground at the end of the shadow and to record the time from your watch.
- Measure and record the distance from the base of the gnomon to the end of the shadow in the table provided. (Optional: Also measure the angle using a compass.)
- Visit the gnomon at least once an hour for the remainder of the day. Measure the length of the shadow (and the optional angle), place a new numbered marker at the end of the shadow, and record the time of day.
- Use your notes to determine which marker is closest to the pole. This is the time of the shortest shadow and is the observation closest to solar noon. If you have the time, you can take more frequent measurements around the time of this observation on the following day to get a better estimate of solar noon.
Observations and results:
- What is the path of the sun as it moves
across the sky? - Does the path of the sun across the sky
and the pattern of the shadows from the
gnomon on the dial change during the
year?
See this experiment in action, courtesy of Waylight Creations!
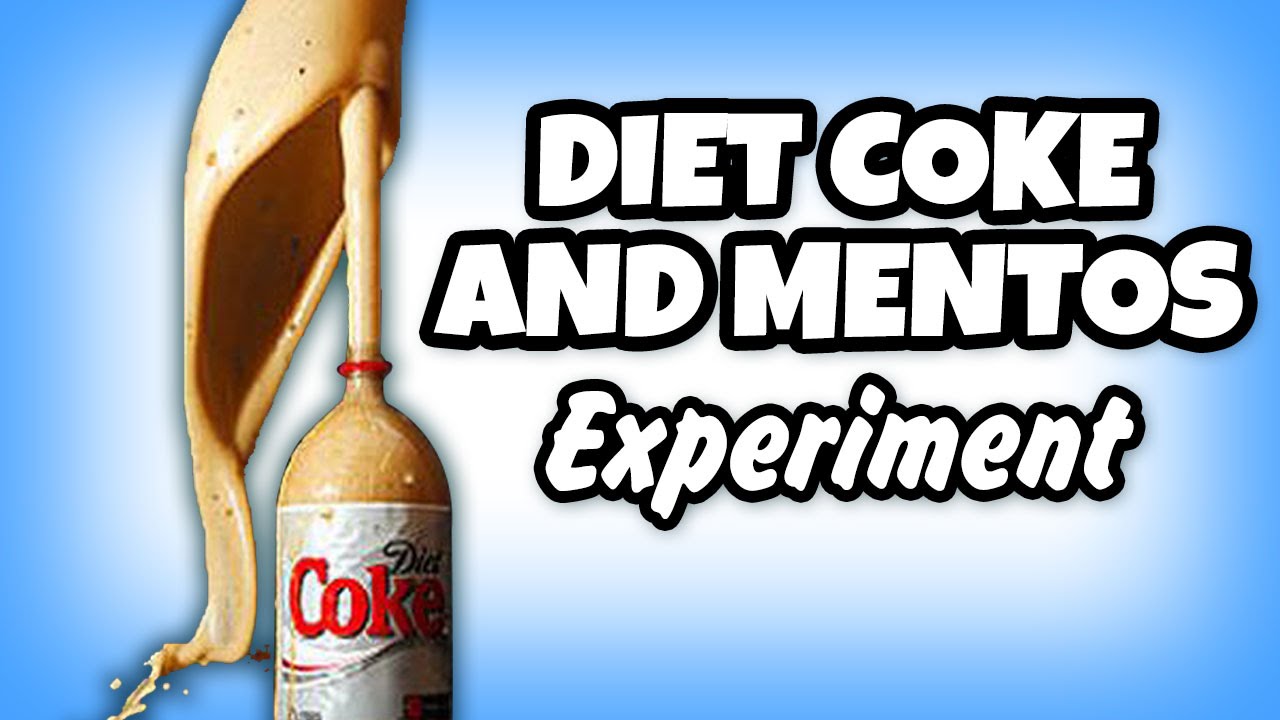
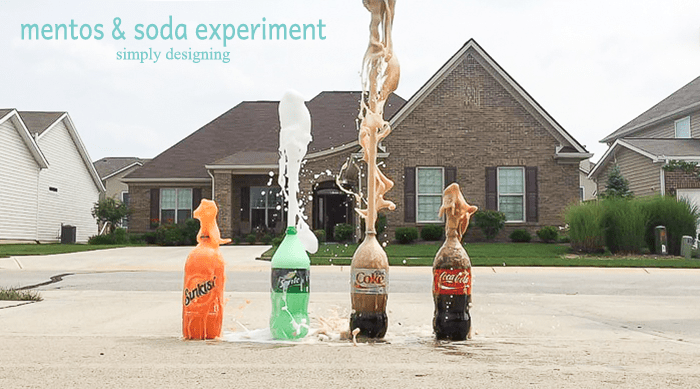
7. Diet Coke and Mentos Eruption Experiment – Via: Science Kids
Source: Image Kid
Here we have one of the most legendary experiments of the modern day! We present to you, the Diet Coke and Mentos Experiment!
First things first, do NOT attempt this experiment indoors! This will, without a doubt, make a HUGE mess! Though simple in its form, this timeless experiment is sure to entertain young scientists of all ages. Make sure you grab some eye protection for this one! Once you’ve done the experiment with traditional Diet Coke, try repeating the steps with other beverages!
To get started, all you will need is:
- 2-liter(s) of Diet Coca-Cola
- 2-liter(s) of other beverages (optional).
- Roll(s) of Mentos Mints.
- 1 Funnel or tube (optional).
Steps to create this experiment:
- Set up your materials OUTSIDE. Grassy areas work best!
- Stand the 2-liter of Diet Coke upright and unscrew the lid.
- If you’ll be using a funnel or other device, attach it to the top of the Coke bottle now.
- Quickly drop 1/2 of the Mentos pack into the Coca-Cola bottle and RUN!
- Record observations.
Observations and results:
- How long did it take for the geyser to begin?
- If you add more Mentos, is the eruption bigger?
- Did the type of beverage make a difference?
Although there are a few different theories around about how this experiment works, the most favoured reason is because of the combination of carbon dioxide in the Diet Coke and the little dimples found on Mentos candy pieces.
The thing that makes soda drinks bubbly is the carbon dioxide that is pumped in when they bottle the drink at the factory. It doesn’t get released from the liquid until you pour it into a glass and drink it, some also gets released when you open the lid (more if you shake it up beforehand). This means that there is a whole lot of carbon dioxide gas just waiting to escape the liquid in the form of bubbles.
Dropping something into the Diet Coke speeds up this process by both breaking the surface tension of the liquid and also allowing bubbles to form on the surface area of the Mentos. Mentos candy pieces are covered in tiny dimples (a bit like a golf ball), which dramatically increases the surface area and allows a huge amount of bubbles to form.
The experiment works better with Diet Coke than other sodas due to its slightly different ingredients and the fact that it isn’t so sticky. I also found that Diet Coke that had been bottled more recently worked better than older bottles that might have lost some of their fizz sitting on shop shelves for too long, just check the bottle for the date.
via: Science Kids!
See this experiment in action, courtesy of Olivia Rose!
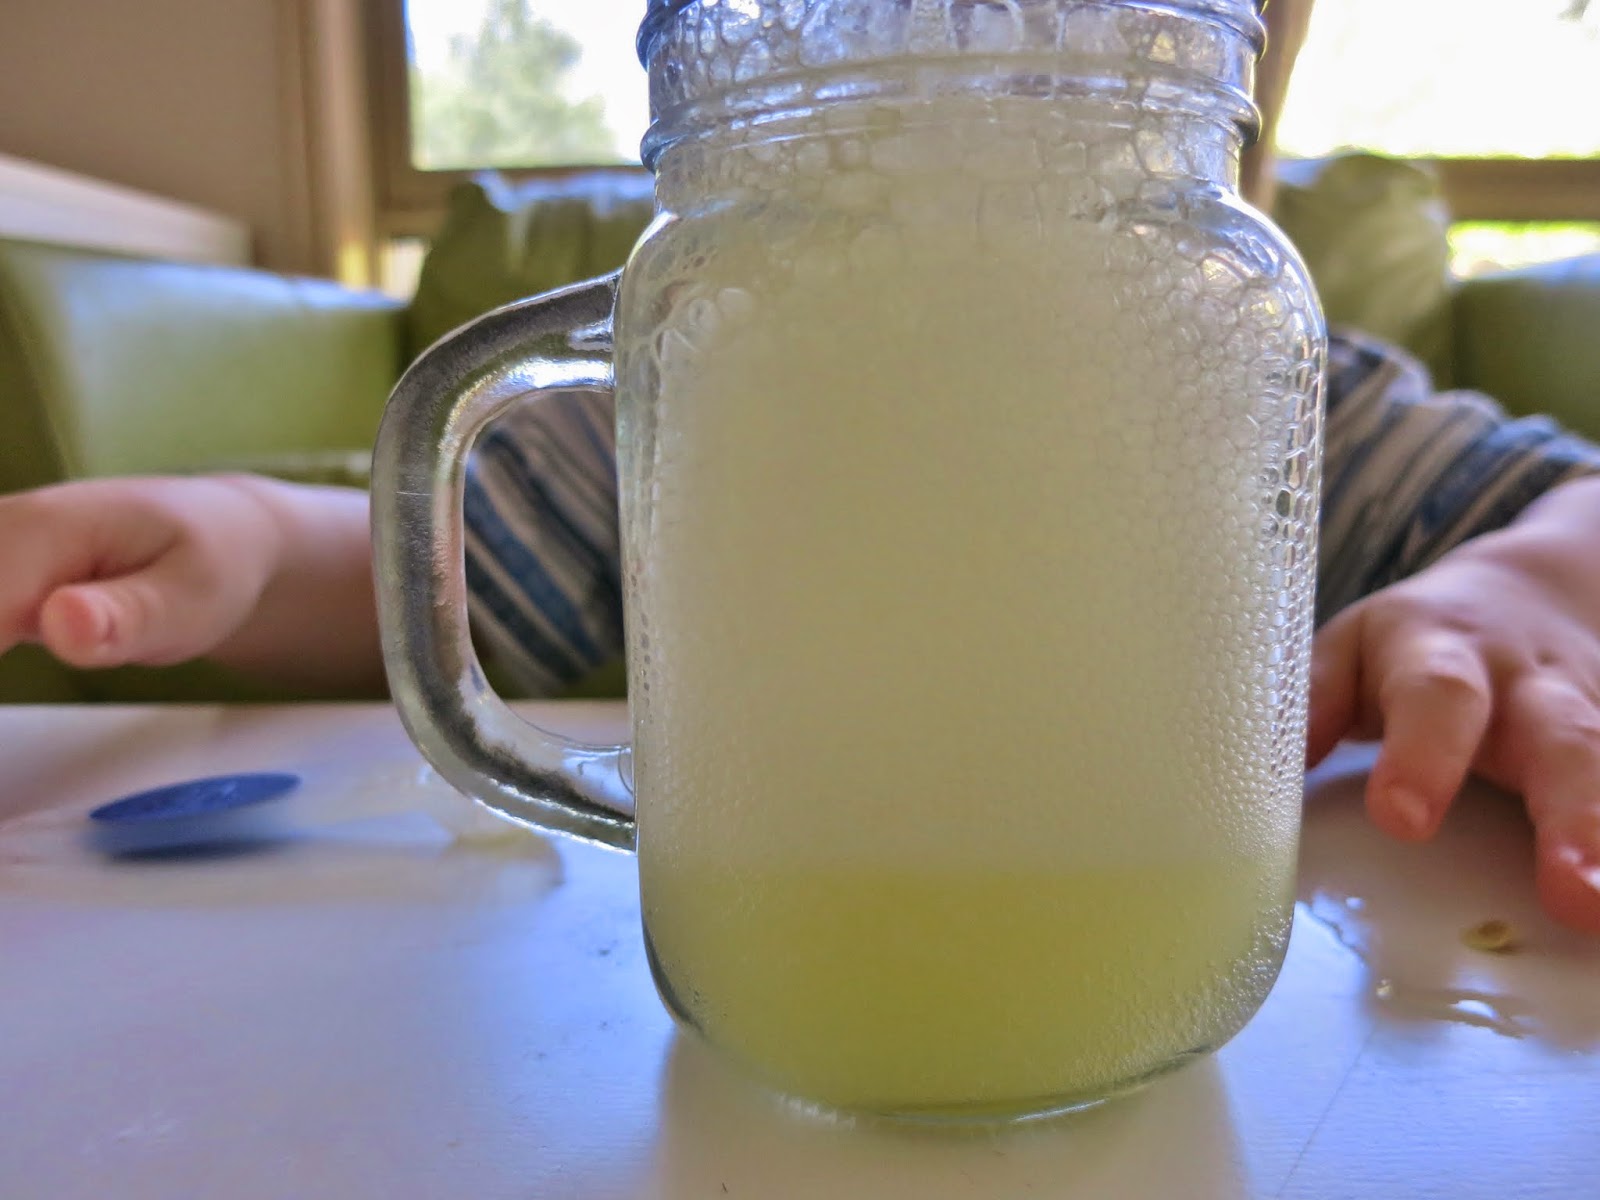
8. Fizzy Lemonade Drink Experiment – Via: Amazing Girls Science
Source: Learn With Play
After trying the last 7 experiments, you might be thirsty! So, here’s an experiment you can drink when you’re finished!
In this tasty science experiment, you’ll be combining an acid with a base (just like in our awesome volcanoes)… but this will probably be a lot more refreshing than if you drank the vinegar eruption!
To get started, all you will need is:
- Fresh Ripe Lemons!
- Cups.
- Drinking Water.
- Baking Soda.
- Sugar / Honey / other Sweetener.
Steps to create this experiment:
- Squeeze as much of the juice from the lemon as you can into the glass.
- Pour in an equal amount of water as lemon juice.
- Stir in 1 teaspoon of baking soda.
- Observe and note effects.
- Give the mixture a taste and add in some sugar if you think it needs to be sweeter.
Observations and results:
- What happened when you added the baking soda?
- What happens if you use less water in the mix?
- What happens if you use more baking soda?
- What ratio of the ingredients gave you the greatest reaction?
- Did the shape of the cup change anything?
- How did it taste?? Did you need any sweetener?
The mixture you created should go bubbly and taste like a lemonade, soda, fizzy or soft drink, if you added some sugar it might even taste like a lemon flavored soft drink you’ve bought at a store.
The bubbles that form when you add the baking soda to the lemon mixture are carbon dioxide (CO2), these are the same bubbles you’ll find in proper fizzy drinks. Of course they add a few other flavored sweeteners but it’s not much different to what you made.
If you are wondering how the carbon dioxide bubbles formed, it was because you created a chemical reaction when you added the lemon (an acid) to the baking soda (a base).
via: Science Kids!
See this experiment in action, courtesy of HM 4U
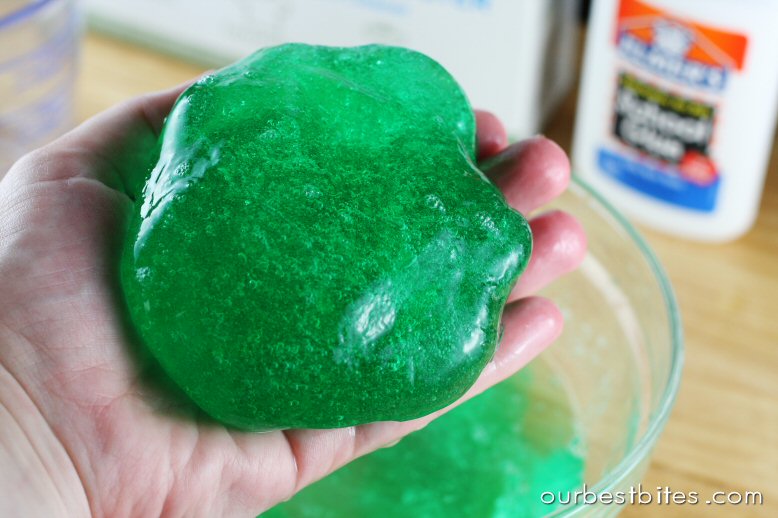
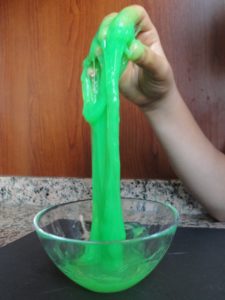
9. Making Putty, Flubber, or Slime Experiment – Via: Science Kids at Home
Source: Our Best Bites
This experiment is another timeless classic! It’s gone by MANY names over the years, but our favorite is… FLUBBER!
If you’re reading this and have not seen Robin Williams in Flubber… you might not be ready for this experiment! P.S. That movie features a ton of funny science experiments!
In this gooey kids science experiment, we’ll be combing a few more household items to create something totally strange and amazing! Please note, this experiment has a few more steps and parental / teacher supervision is recommended.
Subjects: Chemistry / Polymers
To get started, all you will need is:
- Borax (can be found with laundry detergents in most grocery stores).
- White glue.
- Water.
- 2 glass jars with lids.
- Food coloring or liquid paint (optional, but totally worth it!)
Steps to create this experiment:
- Pour 4 cups of water into a large glass jar.
- Add 1/4 cup Borax and stir until it is dissolved.
- In the 2nd jar, mix 1 cup water and 1 cup white craft glue.
- Tighten the lid and shake well until mixed.
- Add food coloring or paint to the water and glue mixture.
- Pour 1 cup of the Borax solution in a cup.
- Add 1/4 of the glue solution to this mixture.
- Use your finger or a device to give the mixture a stir.
- Observe Results.
- Remove the putty from the solution and knead it to get the finished texture.
Observations and results:
- What happened when you combined the two solutions?
- How long did it take for the reaction to happen?
- Was your flubber sticky or smooth?
- Does it bounce like in the movie?
- Did you choose to give your flubber a color? If so, which one?
In the flubber experiment, borax starts out as a solid but creates a mixture with the glue and water. The glue is also a liquid. When they are combined, they create a colloid polymer.
A colloid is a mixture where the particles are too large to dissolve but small enough to remain suspended in the liquid. A polymer is a long chain of molecules that look something like strands of cooked spaghetti. With a polymer colloid, the suspended particles are long polymer strands.
If the polymer chains slide past each other easily, then the substance acts like a liquid, because the molecules flow. If the molecules hook together at a few places along the strand, then the substance behaves like a rubbery solid. Borax is responsible for hooking the glue’s polymer molecules together to form the putty-like material.
When you stretch the putty, it stretches without breaking, but can be “snapped off” cleanly. It bounces higher than a rubber ball, with a rebound of 80%. If you hit it with a hammer, it keeps its shape, but pushing it with light pressure flattens it easily.
If you just let the putty sit or squish it with your fingers, the molecules slide over each other and the material flows. When you drop it like a rubber ball, the impact tries to make the molecules move past each other very fast. It doesn’t work. They’re too tangled.
via: Science Kids at Home!
See this experiment in action, courtesy of Whiz Kid Science
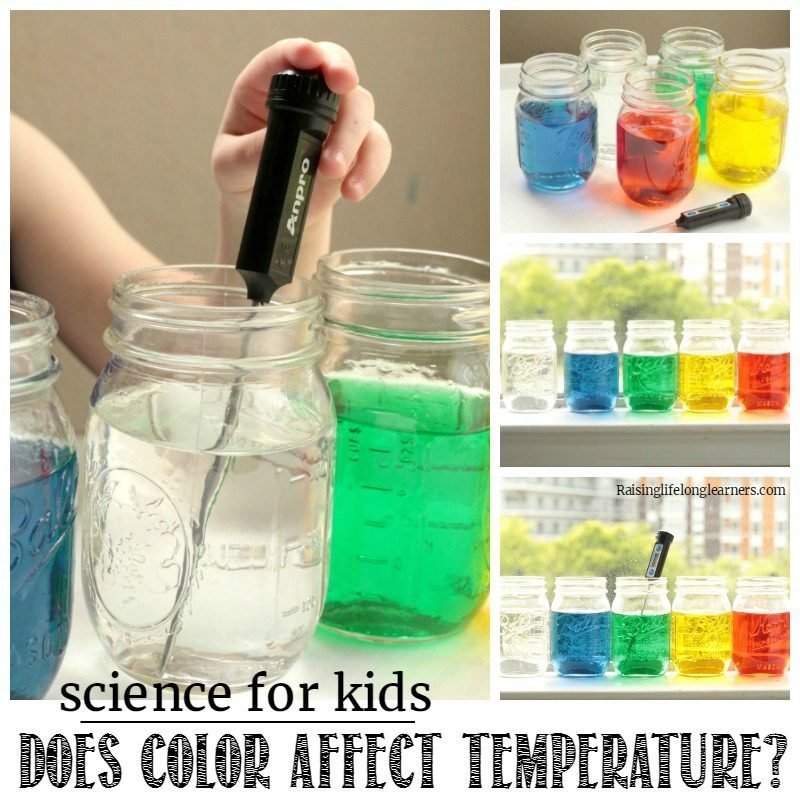
10. Light Color Heat Absorption Experiment – Via: Discovery Express Kids
Source: Raising Life-Long Learners
If you’ve ever burned your toes on blacktop/asphalt paving in the summer, but questioned why dirt or the concrete around the pool isn’t so bad… then you’re going to love science experiments like this one!
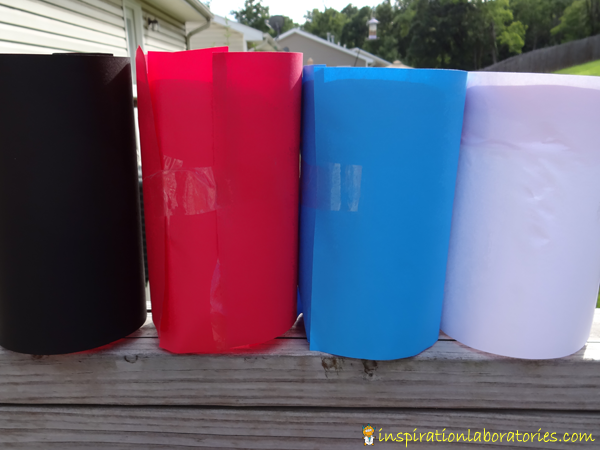
Today, we’re going to test whether or not the color of a surface ACTUALLY makes a difference in how hot things can get! This final kids science experiment is going to test the difference between the extremes of black and white; however, we recommend you repeat the process with all of your favorite colors! Pro Tip: Get a pad of various colored construction papers, all of the same thickness. You can also try a variation of this experiment using food coloring in water (as shown in the picture).
To get started, all you will need is:
- 2 or more identical glasses or mason jars.
- Water.
- Black construction paper.
- White construction paper.
- Other construction paper (optional).
- Food coloring (optional).
- Tape or rubber bands.
- Thermometer(s).
- A sunny day
Steps to create this experiment:
- Cut black construction paper to the same height as one of the glasses.
- Wrap the black construction paper around the glass so it covers the entire outside surface.
- Tape the paper in place or put a rubber band around the glass to hold the paper in place (see image below).
- Repeat steps 2-4 with the other containers using white paper, other colored paper, or add food coloring (if desired).
- Fill all of the glasses with water. Make sure they have the same amount of water in them, and make sure you use the same temperature of water in both glasses.
- Use the thermometer to take the temperature of the water in each glass, then record this as your starting temperature.
- Use the thermometer to take each glass’s temperature every 15 minutes for two or more hours. Record the temperatures and the times for each entry.
- Take note of your observations as you go.
- When the two hours are up, you can use this data in combination with an excel spreadsheet or google doc to create a line graph that represents th temperature change in each glass. Temperature should be your Y-axis and time should be your X-axis.
- Optional bonus: Remove the glasses from sunlight and bring them inside. Record their temperature for another hour or two and observe which one COOLS the fastest!
Source: Inspiration Laboratories
Observations and results:
- Did one color heat up more rapidly than the others?
- Did they all reach the same temperature at the end?
- Did one color release the heat / cool faster?
- How do you see this information being applied in real life? Think construction materials!
We know that sunlight includes IR and UV as well as visible light. Certain types of paint may reflect more or less IR and UV light than others. You may have heard of Light Reflectance Value (LRV), which is used to measure how much visible light a certain color reflects, but there’s also a Solar Reflectance Index (SRI) which measures how much solar heat (i.e., infrared light) a given material reflects
If we look up the LRVs for the colors white and black, we find that white reflects 80% of visible sunlight, and black reflects only 5%. So we can conclude that, regardless of the color of the interior, the car with the darker paint job will have the higher temperature.
via: MadSci Network: Physics!
See this experiment in action, courtesy of Curiosity Catalase
11. Floating paperclip – Via: Science Bob
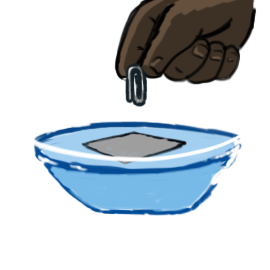

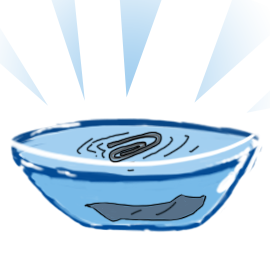
Image source: Science Bob
This experiment is very simple, and yet very enjoyable to do. This will help you understand why some insects are able to walk in the water.
You will need the following:
- Dry paper clips
- Water in a bowl
- Tissue paper
- Any pencil with an eraser
Steps to create this experiment:
- Make sure that the bowl is filled with water.
- Tear a piece of tissue paper.
- Drop the piece of tissue on the water surface.
- Place the paper clip on the top of the tissue. Make sure that you won’t touch the water in doing so.
- Using the eraser end of the pencil, poke the tissue to make it sink. If you did it correctly, the paperclip will float.

Observations and results:
- What did you notice when you gently put the paperclip on top of the tissue?
- Did the paperclip remained floating or did it sink along with the tissue?
The paperclip was able to float because of SURFACE TENSION. In other words, the water surface develops a skin where the water molecules hold close together. If you did it right and you followed all the steps, the water molecules can support your paperclip. This is how water striders appear like they are walking on water when in fact, they are held up by surface tension.
12. Plastic milk – Via: Science Bob
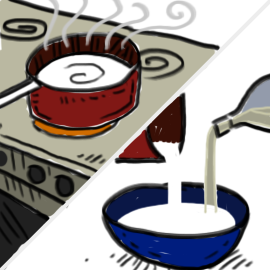
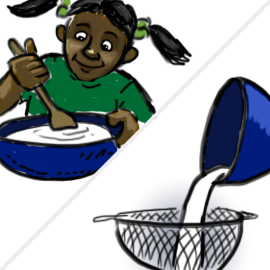
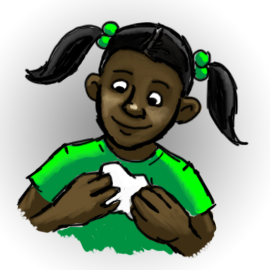
Image source: Science Bob
Milk isn’t just for drinking. They can also teach you about chemical reactions through some science experiments. We have included one fun project here for you to accomplish. Just make sure that you are accompanied by an adult as you do this.
You will need the following:
- One cup of milk (any brand)
- 4 teaspoons of white vinegar
- A medium-sized bowl
- A strainer
Steps to create this experiment:
- Ask an adult to heat up the milk but not up to the boiling point.
- Pour the milk into the bowl through the assistance of your adult companion.
- Mix the vinegar to the milk and stir it for one minute.
- Strain the milk so you are left with lumpy blobs.
- Collect the blobs and press them together when they already cooled down. You’ll finally have the plastic milk that you can mold.
Observations and results:
- Were you able to get milk blobs from your experiment?
- What is the texture of the blobs?
Through combining milk and vinegar, you were able to produce a substance called CASEIN. This is plastic-like so you can mold it into any shape you want. How is this possible, you ask. The milk protein and the acid in the vinegar produce this substance when you started mixing them. It is important to note, however, that this is different from true plastics or polymers.
13. Make a snow globe – Via: Science Fun
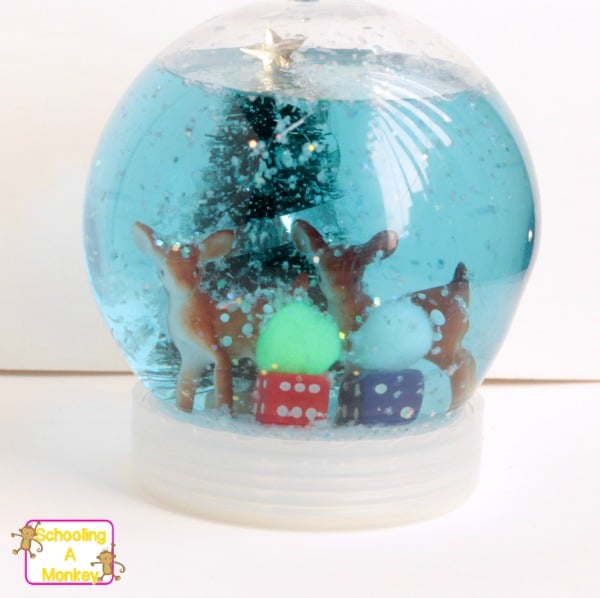
In this experiment, we will teach you how to make a snow globe that you can add as a little accent for your home. Ask the help of an adult friend if you are having difficulties so you can add this to the list of science experiments you successfully made.
You will need the following:
- A jar with a lid
- White glitter for the snow effect
- Water
- Glycerin
- Small toys (animals, trees, etc)
- Glue or tape
Steps to create this experiment:
- Glue all the little toys you found on the lid of the Jar. If you want to make a mini Christmas village, then you may do so.
- Fill half of the jar with glycerin and the other half with water. Stir afterward.
- Add some glitter to make it look like it’s snowing inside your jar. You can also add more if you want to achieve the blizzard effect.
- Put the lid on which contains the toys.
- Put some tape of glue around the lid so the glycerin and water combination won’t spill accidentally.
Observations and results:
- Did you notice that as you shake your globe, the fluid inside does not flow like normal water?
- Did the fluid cause the snow effect?
Because you combine the water with glycerin, you were able to create your own snow globe. Glycerin has a high viscosity so it looks like the snow is slowly falling down inside the jar. Viscosity dictates how a fluid easily pours so you when you shake or turn your snow globe, the liquid slows down the glitters as gravity pulls them down. This is one of the science experiments that are fun to create and the output is also something you can use and display afterwards.
14. Expanding soap – Via: Science Fun
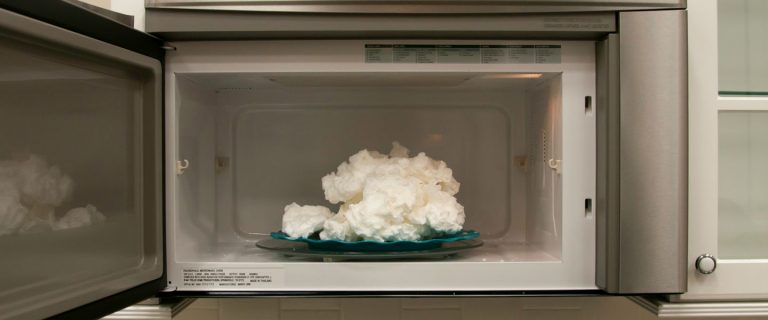
Some science experiments seem weird. Just like this one. We do not recommend doing this alone so you better ask the help of an adult friend. In this experiment, we will look at the possibility of expanding a little ivory soap. Read on to learn more.
You will need the following:
- Large microwave
- Ivory soap
- Big bowl
Steps to create this experiment:
- Place the ivory soap inside the bowl.
- Put it inside the microwave for two minutes.
- Notice how it grows! Take a video if you like.
- Wait several minutes before taking it out from the microwave so it can cool down.
Observations and results:
- How big did the soap grow in the span of two minutes?
- What is the texture of the soap after getting it out from the microwave?
Because the ivory soap has a lot of air bubbles in it, there is a high possibility that it will grow once it is heated for several minutes. The air bubbles expanded when it was put inside a microwave, resulting in a massive soap. Since soaps are solids, it will remain expanded even when it cooled down. You can still use the soap you experimented it by cutting it into smaller pieces.
15. Dancing raisins – Via: Coffe Cups and Crayons
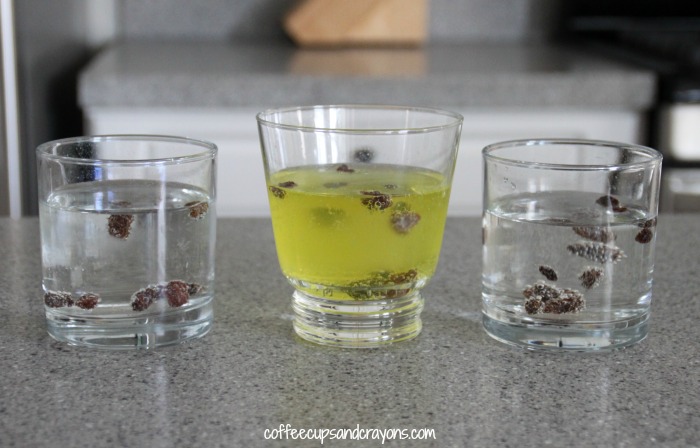
This is probably considered one of the top easy science experiments out there. You will be able to do this in three simple steps without needing the supervision of an adult. If you would love to see how air bubbles work in lifting objects in the water, then you will enjoy this.
You will need the following:
- Clear sodas
- Raisins
- 4 Glasses
- Water
Steps to create this experiment:
- Fill the three glasses with different kinds of sodas and the other one with water. Make sure to use sodas that weren’t refrigerated.
- Put the raisins into the soda and watch them dance!
- Put raisins on the water and compare its movement to the raisins you put into the soda.
Observations and results:
- Did the raisins sink when you put them in the soda?
- Did they float after some time?
- What was the movement of the raisins you put in the soda as compared to the ones that you dropped in the glass with water?
Since the raisins are denser than the soda, it initially sunk to the bottom. However, because air bubbles formed outside the raisins, they started to float all the way to the top. They fall back down once all the bubbles already popped. This makes them appear as if they were dancing. There are a lot of science experiments similar to this one that will show you how objects dance when put in soda.
As you can see, there is a TON of safe, fun, and easy science experiments you can do at home or in the classroom! There are also some educational apps for kids that will teach you these. Which ones of these top 15 did you try yourself? Are there any others you’d recommend to the Student-Tutor community? Post them below!
Todd VanDuzer
Latest posts by Todd VanDuzer (see all)
- Why Finding the Right Thing to Study Matters: Setting the Foundation for Success - July 26, 2023
- How USA Staff Onboarding Benefits From Innovative Software - July 26, 2023
- Top 7 Best Reasons to Get an MBA - June 7, 2023
- How to Support Your Child When They Go to College - April 29, 2023
- How to Maximize Your Job Search with Expert Resume Writers Experienced in Your Field - April 20, 2023